Month: May 2023

  • How to prepare your computer and laptop for summer?

    How to prepare your computer and laptop for summer?

    How to prepare your computer and laptop for summer?

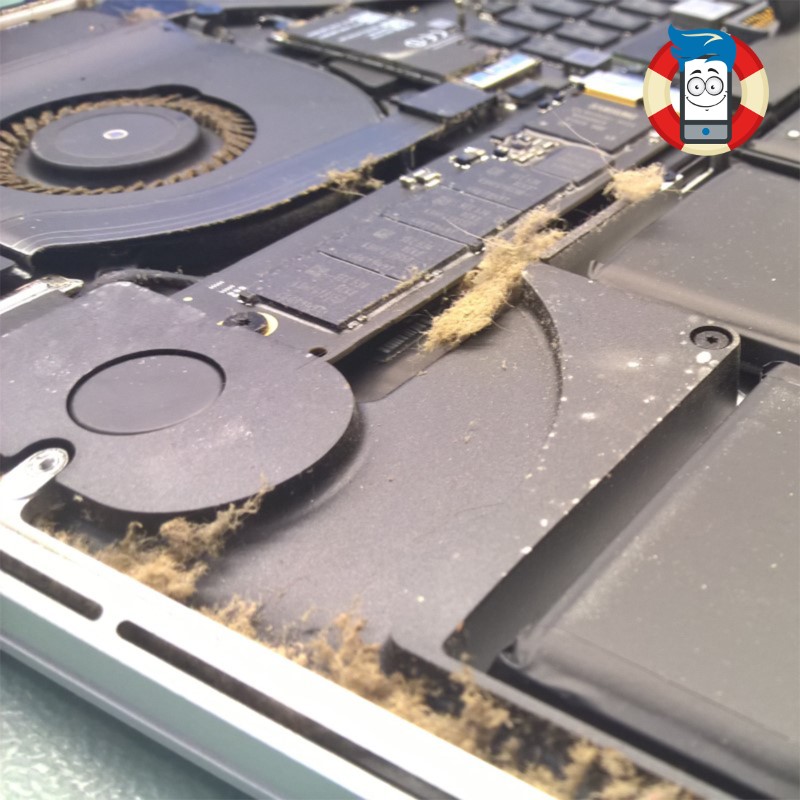
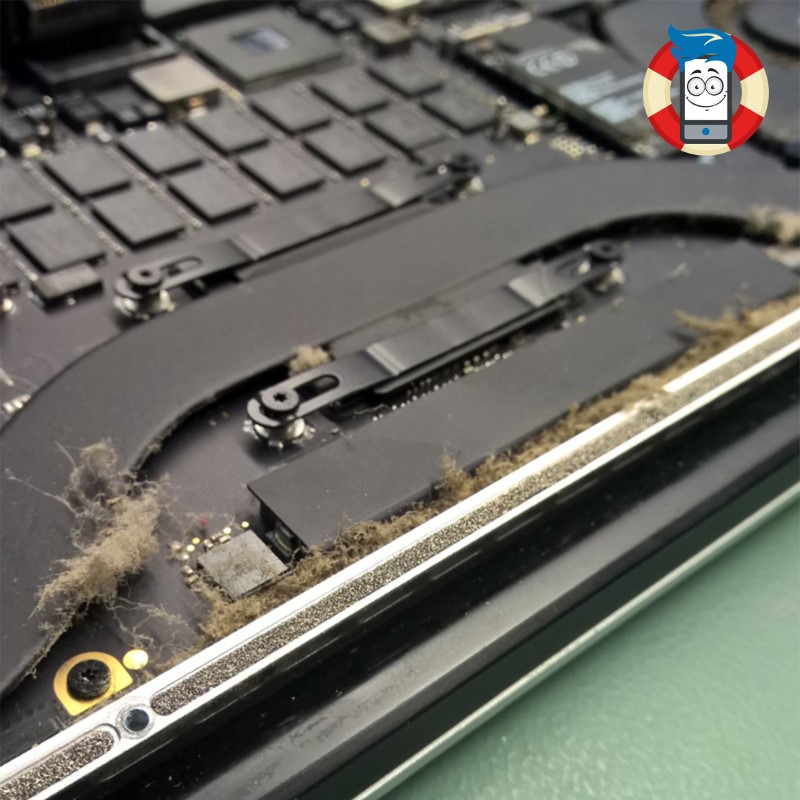
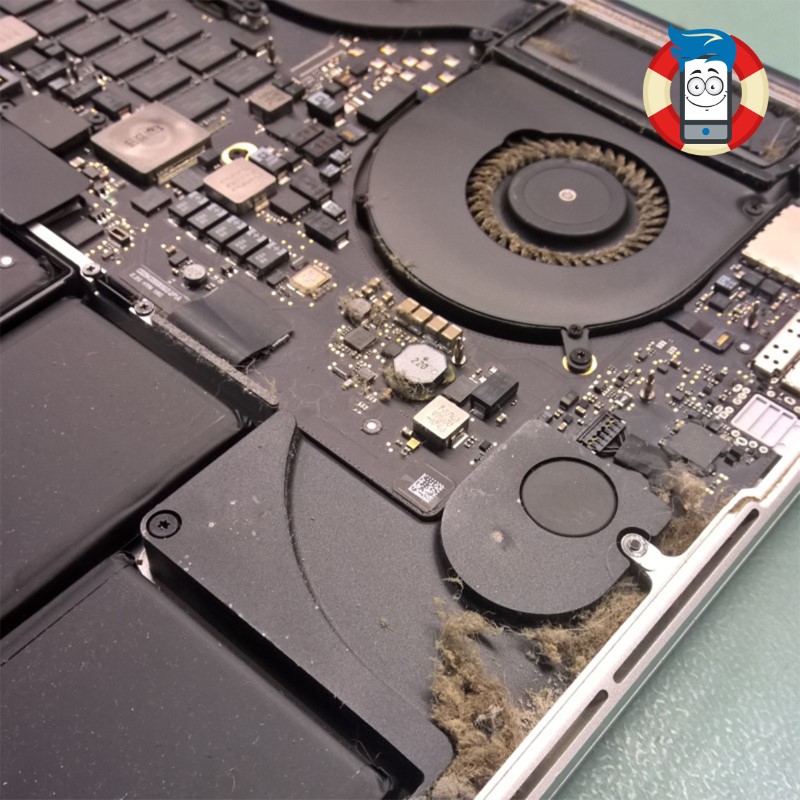
    Is your laptop’s fan exhibiting increased noise levels recently? Over prolonged usage periods, laptops accumulate a significant amount of dust internally. Without proper ventilation, the compact nature of laptop casings and the utilization of small fans and radiators can impede effective heat dissipation. When dust accumulates within the vents, it poses a potential disaster. This can severely damage the graphics system, necessitating costly repairs.

    Furthermore, elevated temperatures in the processor and graphics system can cause the laptop’s internal temperature to rise to a point where memory chips may experience data distortion, leading to errors in reading and writing data on the hard drive. It’s important to note that high temperatures also risk the hard drive’s health, as operating above 60 °C significantly increases the likelihood of imminent failure. Can you afford to lose all the precious photos, videos, and documents stored on your hard drive?

    If you have observed a noticeable increase in the frequency and volume of your laptop’s fan activity, it may be prudent to consider a comprehensive internal cleaning.
    Cooling improvement

    Can it really be that bad?

    Indeed, the consequences of inadequate laptop cooling can be quite severe. To understand why such issues arise, it is essential to delve into the intricacies of laptop cooling design. A laptop’s cooling system is engineered to maintain a consistent air circulation flow. Typically, air intake occurs from one side of the laptop case, often from the bottom, where an operational fan draws in the surrounding air. Through a process known as convection, this air then moves through the heat sink lobes, effectively dissipating heat before being expelled from the laptop.

    However, when we inadvertently place our laptops on carpets or bedding, many problems can arise. The very act of doing so introduces dust particles and small fragments of material into the equation. These particles are effortlessly sucked into the laptop through the ventilation holes, clogging the air intake and the radiator. Consequently, this impedes the cooling process, leading to suboptimal temperature regulation within the laptop.

    The accumulation of dust and debris within the laptop’s cooling system can have far-reaching consequences. Firstly, the compromised airflow obstructs the efficient dissipation of heat, causing temperatures to rise. This high heat can strain various components, particularly the graphics system. Over time, these increased temperatures can lead to severe damage, necessitating expensive repairs to rectify the compromised functionality.

    Furthermore, the escalated temperature within the laptop can harm the performance and longevity of the hard drive. Operating at temperatures exceeding 60 °C can increase wear and tear, substantially raising the risk of data corruption and potential hard drive failure. The implications of such an event extend beyond mere inconvenience, as the loss of cherished photos, videos, and important documents stored on the hard drive can be devastating.

    To mitigate these risks and maintain the optimal performance of your laptop, it is crucial to adopt proper practices in ensuring adequate airflow and cooling. Avoid placing the laptop on soft surfaces such as carpets or bedding, as they act as dust magnets and impede ventilation. Instead, opt for flat and solid surfaces that allow for unobstructed airflow. Additionally, periodic cleaning of the laptop’s ventilation holes and heat sink is highly recommended. This can be accomplished through gentle vacuuming or compressed air, effectively removing accumulated dust and debris and restoring optimal airflow.

    Maintaining a proactive approach to laptop cooling and adhering to these preventative measures can safeguard your device from the detrimental effects of dust accumulation and subpar cooling. Your laptop’s longevity and performance will be preserved, ensuring a seamless computing experience while safeguarding your valuable data.

    In conclusion, recognizing the importance of laptop cooling and taking the necessary steps to maintain it can spare you from potential hardware damage, costly repairs, and the heartache of losing irreplaceable digital assets. Embrace a proactive stance toward laptop maintenance and cooling, and you’ll reap the rewards of a reliable and efficient computing companion for years.

    Professional preparation of your laptop for the hot summer
    Cooling improvement

    At Phones Rescue, we take great pride in providing comprehensive and professional solutions to address the specific needs of your computer. In our commitment to ensuring optimal performance and longevity, we offer a range of specialized services that go beyond mere cleaning.

    When you bring your computer to Phones Rescue for internal cleaning, our highly skilled technicians will meticulously remove accumulated dust and debris from the intricate components. We will disassemble your computer with utmost care and precision, gaining access to the internal regions prone to dust accumulation. Using industry-leading tools and techniques, we will eliminate every trace of debris, leaving your computer’s internals immaculately clean.

    But our dedication to excellence doesn’t end there. We understand that effective heat dissipation is crucial for maintaining the health of your computer’s vital components. As part of our comprehensive service, our technicians will apply fresh thermal paste to the processor and graphics chip. This critical step ensures optimal thermal conductivity, allowing heat to be efficiently transferred away from these sensitive components. By applying high-quality thermal paste, we enhance the cooling capabilities of your computer, mitigating the risk of overheating and prolonging the lifespan of your hardware.

    In addition to our internal cleaning and thermal paste application, we go the extra mile by offering a complimentary check of your hard drive’s condition. We understand your hard drive’s critical role in storing valuable data, from cherished memories to essential files. Our knowledgeable technicians will thoroughly examine your hard drive, assessing its health and performance. By detecting any potential issues or signs of imminent failure, we empower you to take proactive measures to safeguard your data. This complimentary service provides protection, ensuring you are not caught off guard by an unexpected hard drive failure.

    At Phones Rescue, we believe in providing a holistic approach to computer maintenance and care. Our commitment to delivering exceptional service extends beyond cleaning your computer’s internals. We aim to equip you with the knowledge and assurance to make informed decisions regarding your device’s well-being.

    By entrusting your computer to Phones Rescue, you can rest assured that our skilled technicians will perform a thorough internal cleaning, apply fresh thermal paste to crucial components, and conduct a complimentary check of your hard drive’s condition. Our unwavering dedication to professionalism and customer satisfaction ensures that your computer receives the highest standard of care.

    Don’t leave the health and performance of your computer to chance. Visit Phones Rescue today and experience the comprehensive services and expertise that have made us a trusted name in the industry. Let us restore your computer to its optimal state, empowering you to enjoy the seamless performance, enhanced longevity, and peace of mind knowing that your data is protected.

    5 ways to improve laptop cooling​

    1. Ensure proper airflow: One of the most effective ways to enhance laptop cooling is to ensure adequate airflow. Avoid placing the laptop on soft surfaces, such as carpets or bedding, which can block ventilation. Instead, use a hard, flat surface that allows for unrestricted airflow.

    2. Use a laptop cooling pad: Investing in a quality laptop cooling pad can significantly improve cooling performance. These pads typically feature built-in fans that help increase airflow around the laptop, keeping temperatures in check. Choose a cooling pad that matches your laptop size for optimal effectiveness.

    3. Clean the vents and fans regularly: Dust and debris can accumulate in the vents and fans of your laptop, hindering proper airflow and heat dissipation. Regularly cleaning these areas with compressed air or a soft brush can prevent clogs and improve cooling efficiency.

    4. Elevate the laptop: Raising the laptop slightly can promote better airflow underneath the device. You can use a laptop stand or even simple household items like a book or small blocks to elevate the back of the laptop, allowing for improved heat dissipation.

    5. Optimize power settings and usage: Adjusting power settings can help reduce the strain on the laptop’s components, minimizing heat generation. Decreasing the display brightness, closing unnecessary applications, and avoiding resource-intensive tasks can all contribute to lower temperatures and improved cooling performance.

    By implementing these five strategies, you can significantly enhance laptop cooling, effectively reducing the risk of overheating and extending your device’s lifespan. Maintaining proper cooling is crucial for your laptop’s optimal performance and longevity.

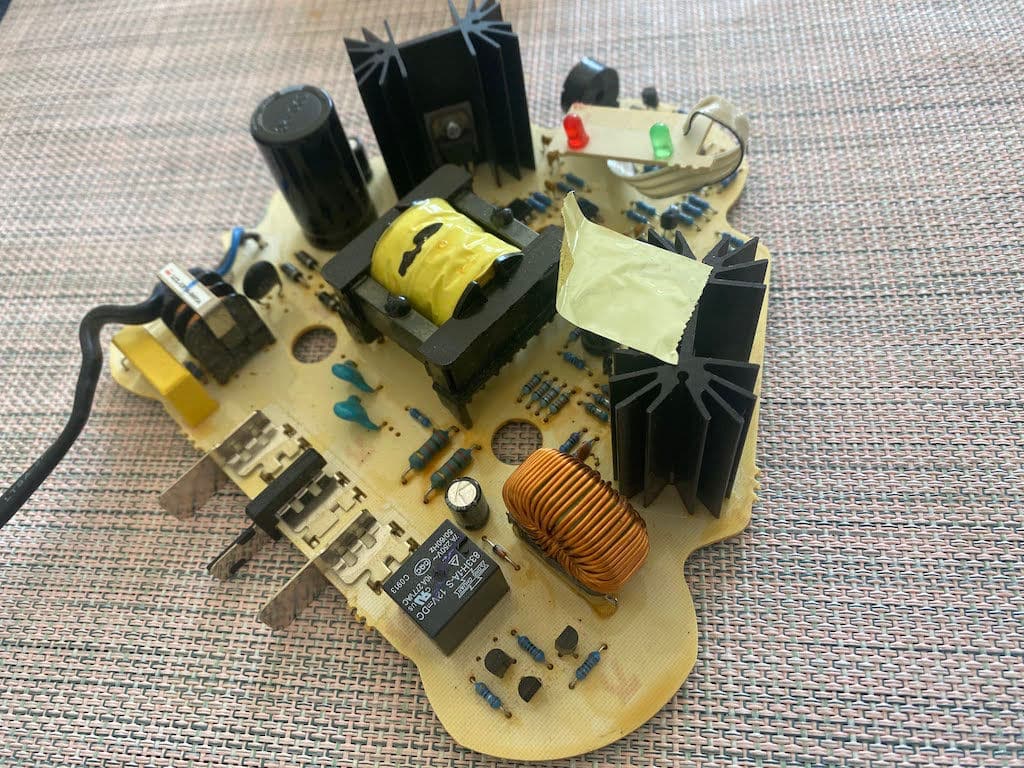
  • Repair of the electric charger for the Bosch Rotak 36 LI lawn mower. AL 3640 CV D-70745.

    Repair of the electric charger for the Bosch Rotak 36 LI lawn mower. AL 3640 CV D-70745.

    Repair of the electric charger for the Bosch Rotak 36 LI lawn mower.

    The Bosch Rotak AL 3640 CV 36V D-70745 lawn mower is powerful and efficient equipment to help you maintain a beautiful and healthy lawn. However, like all electronic devices, it can experience problems and require repairs from time to time. One common issue that users may encounter is a malfunctioning charger. In this article, we will discuss the repair of the Bosch Rotak AL 3640 CV 36V D-70745 lawn mower charger, including the repair of resistors, capacitors, and transformers.

    The first step in repairing the charger is to identify the problem. In some cases, the charger may not work, while in others, it may work intermittently or produce insufficient power. Once the problem has been identified, the next step is to open up the charger and examine the internal components.

    One of the most common issues with the Bosch Rotak AL 3640 CV 36V D-70745 lawn mower charger is the failure of resistors, which can cause the charger to overheat and stop working. The faulty resistors must be identified and replaced with new ones to repair this problem.

    Repair of the AL 3640 CV D-70745 charger

    Another common issue is the failure of capacitors, which can cause the charger to produce insufficient power or fail to work altogether. The faulty capacitors must be identified and replaced with new ones to repair this problem.

    Transformers can also fail and cause problems with the charger. If the transformer is faulty, it may need to be replaced entirely.

    It is important to note that repairing the charger can be a delicate and challenging process, requiring specialized tools and expertise. Therefore, it is highly recommended that you seek the assistance of a professional technician with experience repairing electronic devices, particularly chargers.

    In conclusion, repairing the Bosch Rotak AL 3640 CV 36V D-70745 lawn mower charger involves identifying and replacing faulty resistors, capacitors, and transformers. While it is possible to repair the charger yourself, it is recommended that you seek the assistance of a professional technician for the best results. With proper care and maintenance, your Bosch Rotak AL 3640 CV 36V D-70745 lawn mower charger can provide many years of reliable service.

    If you have a problem with your Bosch Rotak lawn mower, please get in touch with Phones Rescue, and we will help you.

    Repair of the electric charger for the Bosch Rotak 36 LI lawn mower. AL 3640 CV D-70745.

  • DIY Guide: How to Fix Your Cracked iPhone Screen at Home

    DIY Guide: How to Fix Your Cracked iPhone Screen at Home

    DIY Guide: How to Fix Your Cracked iPhone Screen at Home

    Cracked iPhone screens are a common problem that many of us face, and it can be a frustrating and expensive issue to deal with. But what if we told you you could fix your cracked iPhone screen at home without spending a fortune? Yes, you read that right! With the right tools and patience, you can repair your iPhone screen at home and save yourself the hassle and cost of taking it to a repair shop. In this DIY guide, we’ll walk you through the step-by-step process of fixing your cracked iPhone screen at home, so you can get back to using your phone without any issues. Whether you’re a tech-savvy pro or a beginner, this guide covers you. So, let’s get started and learn how to fix your cracked iPhone screen like a pro!

    The risks of fixing your iPhone screen at home

    Before we dive into the DIY process of fixing your iPhone screen, it’s crucial to know the risks involved. Fixing your iPhone screen at home can be risky and may void your warranty if you’re not careful. Also, if you’re not experienced in phone repairs, you may damage your phone further. Therefore, it’s essential to take all precautions necessary and follow the steps carefully.

    One of the significant risks in fixing your iPhone screen at home is the possibility of damaging the phone’s internal components. If you’re not careful, you may break something while trying to replace the screen. Additionally, many iPhone models come with waterproofing, a delicate process to maintain. Therefore, being cautious while fixing your iPhone screen at home is crucial.

    Another risk of fixing your iPhone screen at home is that you may buy low-quality replacement parts. Many replacement parts found online are low-quality and may not last long. Therefore, it’s essential to purchase high-quality parts from reputable sellers.

    Tools and materials needed to fix your iPhone screen

    Before fixing your iPhone screen, you’ll need to gather the necessary tools and materials. Here’s a list of things you’ll need:

    1. Phillips screwdriver

    2. Pentalobe screwdriver

    3. Spudger

    4. Suction cup

    5. Replacement screen

    6. Adhesive strips

    7. Tweezers

    8. Heat gun or hairdryer

    It’s essential to ensure you have all the necessary tools and materials before starting the repair process.

    how to fix cracked iphone screen at home

    Step-by-step guide on how to fix your iPhone screen

    Now that you have all the necessary tools and materials let’s dive into fixing your iPhone screen step-by-step.

    Step 1: Turn off your iPhone and remove the sim card tray.

    Step 2: Remove the two screws at the phone’s bottom using a Pentalobe screwdriver.

    Step 3: Place the suction cup at the bottom of the screen and gently pull it to create a gap between the screen and the phone. Insert the spudger and gently pry open the phone.

    Step 4: Remove the screws that hold the metal plate covering the battery connector.

    Step 5: Disconnect the battery connector and remove the metal plate.

    Step 6: Remove the screws that hold the metal plate covering the display connectors.

    Step 7: Disconnect the display connectors and remove the metal plate.

    Step 8: Remove the old screen and replace it with the new one.

    Step 9: Reconnect the display connectors and replace the metal plate.

    Step 10: Reconnect the battery connector and replace the metal plate.

    Step 11: Turn on your iPhone and test the new screen.

    Tips to avoid damaging your iPhone during the repair process

    Fixing your iPhone screen can be a delicate process, and it’s crucial to take all necessary precautions to avoid damaging your phone further. Here are some tips to keep in mind while fixing your iPhone screen:

    1. Warm the adhesive before opening the screen with a heat gun or hairdryer.

    2. Be gentle while prying open the phone to avoid damaging the internal components.

    3. Follow the steps carefully and take your time while fixing your iPhone screen.

    4. Use high-quality replacement parts to ensure a longer lifespan.

    5. Ensure you have all the necessary tools and materials before starting the repair process.

    Alternatives to fixing your iPhone screen at home

    If you’re not confident fixing your iPhone screen at home, alternative options are available. You can take your phone to a repair shop and have it fixed by a professional. This option is more expensive but ensures that your phone is fixed correctly. Additionally, if your phone is still under warranty, you can take it to an Apple store and have it fixed for free or at a reduced cost.

    Cost comparison – DIY vs professional repair

    Fixing your iPhone screen at home is more cost-effective than taking it to a repair shop. Depending on the iPhone model, a DIY repair kit costs around £20-£50. On the other hand, taking your phone to a repair shop may cost you anywhere between £40-£300, depending on the severity of the damage.


    Where to buy replacement iPhone screens

    Many online stores sell replacement iPhone screens. However, buying from a reputable seller is essential to ensure you get high-quality replacement parts. The best places to buy replacement iPhone screens include Amazon, iFixit, and eBay.

    Common mistakes to avoid when fixing your iPhone screen

    Fixing your iPhone screen can be daunting, especially if you’re a beginner. Here are some common mistakes to avoid while fixing your iPhone screen:

    1. Rushing the repair process

    2. Using low-quality replacement parts

    3. Not following the steps carefully

    4. Applying too much pressure while prying open the phone

    5. Not disconnecting the battery before starting the repair process

    Conclusion

    Fixing your iPhone screen at home is an excellent option if you’re on a budget and have some experience in phone repairs. However, it’s crucial to take all necessary precautions and follow them carefully to avoid further damaging your phone. Additionally, if you’re not confident fixing your iPhone screen at home, alternative options are available, such as taking your phone to a repair shop or an Apple store. Whatever option you choose, ensure that you get high-quality replacement parts and that your phone is handled carefully to avoid further damage.

  • 5 Signs Your iPad Charging Port Needs Repair (And Where to Find the Best Service)

    5 Signs Your iPad Charging Port Needs Repair (And Where to Find the Best Service)

    If you’re an avid iPad user, you know how frustrating it can be when your device won’t charge. While your iPad may not be charging for several reasons, a faulty charging port is one of the most common culprits. If you’re experiencing charging issues with your iPad, it’s important to know the signs that your charging port may need repair. From a loose connection to a burning smell, these signs can indicate a serious problem that shouldn’t be ignored. In this article, we’ll explore the top 5 signs that your iPad charging port needs repair and where to find the best service to get your device back up and running. So, whether you’re a casual user or depend on your iPad for work, read on to learn everything you need about repairing your charging port.

    Common Symptoms of a Faulty Charging Port

    Your iPad’s charging port is a small but essential component that lets you keep your device powered up and ready to go. However, the charging port can become damaged or worn over time, leading to various issues. Here are some of the most common symptoms of a faulty charging port:

    1. Your iPad won’t charge

    The most obvious sign that your iPad’s charging port needs repair is that it won’t charge. This could mean your device isn’t getting any power or only charging intermittently. If you’ve tried using different charging cables and power sources and your iPad still won’t charge, the charging port is likely the culprit.

    2. You see a loose connection

    Another sign of a faulty charging port is a loose connection. If you plug in your charging cable and it doesn’t stay firmly in place, or you have to jiggle the cable to get your iPad to charge, it clearly indicates that the charging port is damaged.

    3. You notice a burning smell

    If you smell a burning odour when charging your iPad, this is a warning sign that your charging port needs repair. The smell could be caused by overheating or a short circuit, which can be dangerous if left unaddressed.

    4. Your iPad charges slowly or intermittently

    If your iPad is charging more slowly than usual or only intermittently, this could be a sign of a damaged charging port. It’s important to address this issue promptly, as a faulty charging port can cause your battery to degrade over time.

    5. You see physical damage to the charging port

    Finally, if you notice any physical damage to your iPad’s charging port, such as a bent or broken pin, this is a clear sign that it needs repair. Even minor damage can cause your device to stop charging altogether, so it’s important to have your charging port repaired as soon as possible if you notice any signs of damage.

    Understanding the Causes of iPad Charging Port Problems

    Now that you know some of the most common symptoms of a faulty charging port, let’s look closely at the underlying causes. Several factors can contribute to charging port problems, including:

    1. Wear and tear

    Over time, your iPad’s charging port can become worn or damaged due to regular use. This is especially true if you frequently plug and unplug your device or use a non-Apple charger.

    2. Moisture or debris

    Water or debris can also cause damage to your iPad’s charging port. If you spill liquid on your device or if dirt or dust gets inside the port, it can interfere with the charging process and cause damage.

    3. Overheating

    If your iPad gets too hot, it can damage the charging port and other components. This can be caused by leaving your device in direct sunlight, using it while it’s charging, or using a non-Apple charger that doesn’t regulate temperature properly.

    4. Physical damage

    As mentioned earlier, physical damage to your iPad’s charging port can cause problems. This can happen if you drop your device or are subjected to other types of impact.


    DIY Fixes to Try Before Seeking Professional Repair

    If you’re experiencing charging issues with your iPad, there are a few things you can try before seeking professional repair. While these DIY fixes won’t work in all cases, they’re worth a try before you spend money on a repair service. Here are some simple fixes to try:

    1. Clean the charging port

    A dirty charging port is one of the most common causes of charging issues. If dirt or debris prevents the charging cable from making a solid connection, your iPad won’t charge properly. To clean the charging port, use a small brush or a can of compressed air to remove any dirt or debris. Be gentle so you don’t damage the port.

    2. Check your charging cable and power source

    Before assuming your charging port is the problem, ensure your charging cable and power source are working properly. Try using a different cable or plugging your device into a different power source to see if that solves the issue.

    3. Restart your iPad

    Sometimes, a simple restart can fix charging issues. To restart your iPad, press and hold the power button until the “slide to power off” option appears. Slide the button to power off your device, then press and hold the power button again to turn it back on.

    4. Update your iPad’s software

    Updating your iPad’s software can also sometimes resolve charging issues. To update your software, follow the prompts to Settings > General > Software Update.

    Choosing the Right Repair Service for Your iPad

    If you’ve tried the DIY fixes above and your iPad still won’t charge, it’s time to seek professional repair. However, not all repair services are created equal. Here are some things to look for when choosing a repair service for your iPad:

    1. Experience and expertise

    Look for a repair service with experience working with iPads and a team of skilled technicians who can diagnose and repair your charging port quickly and efficiently.

    2. Quality parts and tools

    Make sure that the repair service uses high-quality replacement parts and tools. Low-quality parts can cause further damage to your iPad and may not work properly, while subpar tools can make the repair process more difficult and time-consuming.

    3. Warranty

    A reputable repair service will offer a warranty on their work and parts. This gives you peace of mind knowing that if something goes wrong, you’re covered.

    4. Timely service

    Choose a timely repair service that can repair your charging port quickly. You don’t want to be without your iPad for an extended period, especially if you rely on it for work or other important tasks.

    5. Good customer service

    Finally, look for a repair service that provides good customer service. They should be responsive to your questions and concerns and willing to work with you to find the best solution for your needs.

    Top Qualities to Look for in an iPad Repair Service

    Now that you know what to look for in a repair service, let’s take a closer look at some of the top qualities to seek out:

    1. Fast turnaround time

    The best iPad repair services will offer fast turnaround times, so you can get your device back up and running as quickly as possible. Look for a service that can complete repairs within 24-48 hours.

    2. Competitive pricing

    While you don’t want to skimp on quality, you also don’t want to pay an arm and a leg for iPad repairs. Look for a service that offers competitive pricing and doesn’t charge exorbitant fees.

    3. Convenient location

    Choose a repair service that is conveniently located and has easy-to-access hours. This will make it easier for you to drop off and pick up your device without disrupting your schedule.

    4. Positive reviews and ratings

    Finally, look for a repair service with positive reviews and ratings from past customers. This can give you an idea of the quality of their work and their level of customer service.

    iPad Phones Rescue

    Why It’s Important to Address Charging Port Issues Promptly

    If you’re experiencing charging issues with your iPad, addressing them promptly is important. Failing to do so can lead to a range of problems, including:

    1. Battery degradation

    A faulty charging port can cause your iPad’s battery to degrade over time. This can lead to shorter battery life and may require battery replacement.

    2. Overheating

    As mentioned earlier, a damaged charging port can cause your iPad to overheat, which can be dangerous and can cause further damage to your device.

    3. Inability to charge

    If your charging port becomes too damaged, it may stop working altogether. This will leave you unable to charge your device and render it useless.

    Where to Find the Best iPad Charging Port Repair Services

    If you’re looking for the best iPad charging port repair services, there are a few options to consider:

    1. Apple Store

    If you have an Apple Store nearby, this is a great option for repair services. Apple technicians are trained to work on Apple products and can diagnose and repair charging port issues quickly and efficiently.

    2. Third-party repair services

    Several third-party repair services specialize in iPad repairs. Look for a service with a good reputation and positive reviews, and ensure they use high-quality parts and tools.

    3. Online repair services

    Finally, several online repair services can fix your iPad charging port without requiring you to leave your home. Look for a service with a good reputation and positive reviews, and ensure they offer a warranty on their work.

    Cost of iPad Charging Port Repair

    The cost of repairing your iPad’s charging port will depend on a number of factors, including the severity of the damage and the repair service you choose. In general, you can expect to pay anywhere from £50 to £150 for charging port repairs. However, if your iPad is still under warranty, you may be able to have it repaired for free or at a reduced cost.

    Conclusion

    If you’re experiencing charging issues with your iPad, don’t ignore the problem. A faulty charging port can lead to a range of issues and can cause further damage to your device if left unaddressed. Look out for the common signs of a faulty charging port, try DIY fixes, and seek professional repair if necessary. When choosing a repair service, look for experience, expertise, quality parts and tools, a warranty, and good customer service. With the right repair service, your iPad can be back up and running quickly.

  • The Ultimate Guide to iPad Pro Battery Replacement: Everything You Need to Know

    The Ultimate Guide to iPad Pro Battery Replacement: Everything You Need to Know

    The iPad Pro is one of the most powerful tablets on the market, with a sleek design, impressive performance, and long battery life. However, even the best batteries can eventually lose their charge and require replacement. If you are experiencing issues with your iPad Pro battery, it may be time to consider a replacement. But where do you start? With so many options and technical jargon, navigating the world of iPad Pro battery replacement can be overwhelming. That’s why we’ve created this ultimate guide to help you through the process. From understanding the different types of batteries to identifying when it’s time for a replacement, we’ll cover everything you need to know to keep your iPad Pro running smoothly. So, let’s dive in and explore the world of iPad Pro battery replacement together!


    Understanding the battery life of an iPad Pro

    Before you decide to replace your iPad Pro battery, it’s essential to understand how long the battery should last and what factors can affect its lifespan. The battery life of your iPad Pro will depend on several factors, including the age of the device, the type of usage, and the operating system.

    ### 1. Battery lifespan

    The lifespan of an iPad Pro battery will depend on the number of charge cycles it goes through. A charge cycle is defined as charging the battery from 0% to 100%. Apple claims the iPad Pro battery should last up to 10 hours of web browsing, video playback, or music playback on a single charge.

    ### 2. Factors that can affect battery life

    Several factors can affect the battery life of your iPad Pro, including the following:

    – Usage: The more you use your iPad Pro, the faster the battery will drain.

    – Brightness: Higher brightness levels require more power and can cause the battery to drain faster.

    – Background activity: Running multiple apps in the background can cause the battery to drain faster.

    – Temperature: Extreme temperatures can damage the battery and cause it to drain faster.

    Things to consider before replacing your iPad Pro battery

    Replacing the battery of your iPad Pro is not a decision to be taken lightly. Before you start the process, there are several things you should consider to ensure that you make the best decision for your device.

    ### 1. Cost

    The cost of replacing the battery of your iPad Pro will depend on the model you have and where you get the replacement done. Researching the replacement cost is essential to ensure you’re not paying more than you need to.

    ### 2. Age of the device

    The age of your iPad Pro will also play a role in whether you need to replace the battery. If your device is relatively new, it may be worth exploring other options before replacing the battery.

    ### 3. Warranty

    If your iPad Pro is still under warranty, checking whether the battery replacement is covered is essential. If it is, you may be able to get the replacement done for free.

    Steps to replace your iPad Pro battery

    Replacing the battery of your iPad Pro can be daunting, but with the right tools and instructions, it’s something you can do yourself. Here are the steps you need to follow to replace the battery of your iPad Pro:

    ### 1. Back up your data

    Before you start the replacement process, it’s essential to back up all your data to ensure that you don’t lose anything.

    ### 2. Power off your device

    Ensure your iPad Pro is powered off before you start the replacement process to avoid any potential damage to the device.

    ### 3. Remove the screen

    The first step in the replacement process is to remove the screen from your iPad Pro. You’ll need a suction cup and a plastic opening tool.

    ### 4. Disconnect the battery

    Once you’ve removed the screen, the next step is to disconnect the battery from the logic board. You’ll need a Tri-point screwdriver and a spudger to do this.

    ### 5. Remove the adhesive strips

    Once you’ve disconnected the battery, you must remove the adhesive strips holding the battery in place. You can use a plastic card to do this.

    ### 6. Install the new battery

    Once you’ve removed the old battery, you can install the new battery in its place. Follow the instructions that came with the replacement battery to do this.

    ### 7. Reassemble your device

    Once you’ve installed the new battery, you can reassemble your device by following the steps in reverse order.

    Tools needed for iPad Pro battery replacement

    To replace the battery of your iPad Pro, you’ll need the following tools:

    – Suction cup

    – Plastic opening tool

    – Tri-point screwdriver

    – Spudger

    – Plastic card

    Tips for extending the battery life of your iPad Pro

    While replacing the battery of your iPad Pro is a viable solution, you can do several things to extend your device’s battery life. Here are some tips to help you get the most out of your battery:

    ### 1. Adjust brightness

    Lowering your screen’s brightness can help extend your iPad Pro’s battery life.

    ### 2. Turn off Wi-Fi and Bluetooth

    If you’re not using Wi-Fi or Bluetooth, turn them off to save battery life.

    ### 3. Close apps

    Closing apps you’re not using can help extend your device’s battery life.

    ### 4. Use Low Power Mode

    Activating the Low Power Mode can help extend the battery life of your iPad Pro.

    ### 5. Keep your device cool

    Avoid exposing your iPad Pro to extreme temperatures to prevent damage to the battery.

    FAQs on iPad Pro battery replacement

    ### 1. Can I replace the battery of my iPad Pro myself?

    Yes, you can replace the battery of your iPad Pro yourself using the right tools and instructions.

    ### 2. How long does it take to replace the battery of an iPad Pro?

    Replacing the battery of your iPad Pro can take anywhere from 30 minutes to an hour, depending on your experience and the tools you have.

    ### 3. How often should I replace the battery of my iPad Pro?

    You should replace the battery of your iPad Pro when you notice signs of deterioration or after about two to three years of use.

    Where to get your iPad Pro battery replaced

    If you’re uncomfortable replacing your iPad Pro’s battery yourself, you can take it to an Apple Store or authorized service provider to get it replaced. Research the cost and availability of replacement batteries in your area.

    Cost of iPad Pro battery replacement

    Conclusion

    The cost of replacing the battery of your iPad Pro will depend on the model you have and where you get the replacement done. On average, the cost can range from £99 to£149.

    The battery of your iPad Pro is an essential component that can affect the performance and functionality of your device. If you’re experiencing issues with your battery, it may be time to consider a replacement. By understanding the signs of a failing battery and the steps involved in replacing it, you can make an informed decision and ensure that your iPad Pro continues to perform at its best.